 |
| From nz2 |
Franz Josef Glacier on New Zealand’s South Island is one of only three places in the world where you can walk from rain forest to a glacier in less than an hour. It’s also one of the world’s fastest-moving glaciers – and the day I spent glacier hiking on its icy bulk takes its place among my best travel memories.I booked a trip with Franz Josef Glacier Guides. The company offers a number of options: Half-day hikes, full-day hikes, ice climbing and even a heli-hike. We picked the full-day, which was $150 NZ per person. We arrived in the small South Island town of Franz Josef a bit after 4 p.m. on a Tuesday and checked into the Chateau Franz (Read about Chateau Franz). We got only the briefest glimpse of the Franz Josef Glacier that day.
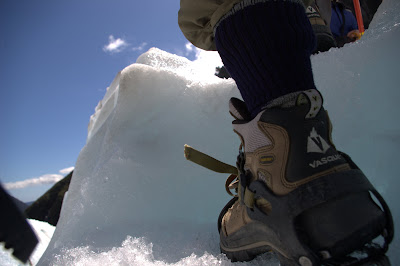
Of course, we were up bright and early to check in at 8:15 a.m. the next day. The Franz Josef Glacier Guides building is just a few minutes on foot away from Chateau Franz. It’s a well-kept building, which always inspires some confidence. First, they give you cards on a neck lanyard for all your equipment. At minimum, you’ll get crampons -a spike-equipped frame that lashes to your hiking boots- and a water-resistant overcoat. You can also get overtrousers, a hat, gloves and sturdy hiking boots.
You’ll need to bring your own sunscreen, water and snacks. Two liters of water per person should be enough. Once everyone arrives, you’ll get herded into a smaller room to get your boots fitted for crampons. They’ll also issue you any other needed gear – they take the cards off your lanyard that correspond to the equipment. You’ll get the cards back when you return the gear, which lets them know everything is back in its place.
 |
| A wide shot of Franz Josef Glacier.                                                          From nz2 |
From there, you get loaded onto the bus for a 15-minute ride to a parking lot. You’ll walk for about fifteen minutes from the car park through a rain forest before breaking into the glacier valley. At this point, the guides will break you up into a number of groups with about 12 people each. They try to arrange them according to expected pace. We selected group three – I wanted time to take photos, and we had a good feeling about the guide.
 |
| John-O, our guide for the day.                       From nz2 |
The guide for our group was John-O, a great young bloke born and raised in the South Island. He was talkative and knew his stuff. He was also very good about teaching us how to be safe without talking down to anyone: He’d offer his tip of the moment, followed by a short explanation of why that’s the best way to do it. Then, he’d say “Right! Does that make sense”” Aside from guiding us, John-O also got to chip our a “stairway” of sorts. The guides before him do the same, marking the best path for that day’s hikes. Remember, the glacier is in a constant state of change! But I’m getting ahead of myself. First, we had to hike about a mile up the valley to the terminal face of the glacier, which New Zealanders pronounce “Glay-see-ya.”
 |
| From nz2 |
As we marched closer, we could see that the glacier wasn’t just a monolithic slab of ice: It’s really a series of fold, valleys and trenches. The bottom is littered with gray rocks, but the ice emerges a few minutes from the terminal face. There, you can see the blue stripes.
 |
| From nz2 |
After you scale the terminal face, you’re glacier hiking! You’ll put  attach the crampons to your hiking boots and get onto the ice briefly before going through another rocky section. John-O gave us some good pointers about using crampons (see Tip 6 below). The hike was fairly slow because John-O often had to use his pickaxe to carve out some steps. “I want a pickaxe!” Sarah told me.
 |
| I can haz ice axe!                                                                                        From nz2 |
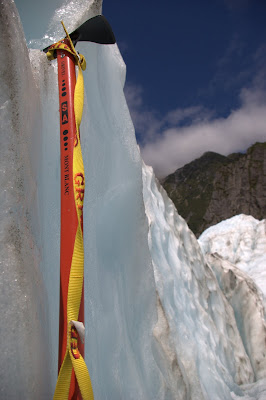
About 20 minutes later, we emerged into a flat section, where the guides had stashed boxes of ice axes. Sarah was getting her wish! I won’t give you the pickaxe tips because you really need to hold one in your hand to properly get the technique down. Or have illustrations, and I’m a miserable artist. The ice axes are meant to give you an extra point of contact through the more technical section to come.
All day, helicopters had been flying over our heads for tours and to drop people off higher for some quick glacier hiking.
“I love flying in helicopters as much as anyone,” I told John-O, “but there’s no possible way being up there is as awesome as being down here.”
John-O and I definitely saw eye-to-eye on that point.
From here, we kept going up the glacier. We entered a much steeper series of ridges and folds. There were holes in the ice everywhere, and you could hear water flowing everywhere under the ice.
This is where I came to understand that a glacier is a living and breathing entity, not static bunches of ice. Rivers flowed under this behemoth, and I could hear the gushing that is its heartbeat. Looking up the mountain toward its source, I was just amazed by its scope and dynamics. I expected this to be a fun experience – but something about Franz Josef Glay-see-ya transcended mere fun. I’ll put it this way – I can’t wait to hike another glacier.
 |
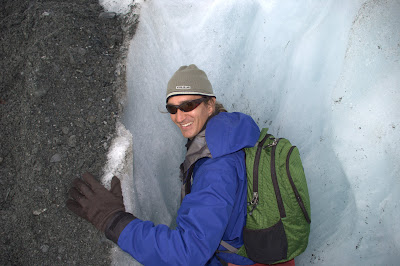
| Wandering Justin hangs out after lunch.      From nz2 |
And the beauty of it! Every fold and ridge reflected the sunlight. It seemed almost manufactured in its perfection – like it had been designed to delight the eyes. We climbed through its ripples and folds, setting into an ark-like valley about 100 feet long for lunch. For us, it was all carob-coated energy bars. Some people brought sandwiches, pitas and the like. We kept it simple.
 |
| Slipping into an ice hole.                                                                           From nz2 |
From there, it was time to head back down. John-O guided us expertly, finding us a bit of fun: a small ice tunnel and a super-narrow trench that I really had to wriggle through for my shoulders to pass. The water on the ice helped lubricate me, and I slithered through. Good fun!
 |
| A tight squeeze.                                              From nz2 |
But we knew some bad news was coming as we headed back into the flat section: We’d soon reach the box to return our now-beloved ice axes. “Start saying good-bye to them,” John-O joked. “It makes the separation easier!” Though it was nearly 3:30 p.m. and we’d spent many hours on the ice, nobody was really looking forward to this amazing day being over. But too soon, it was over. But I was glad to unlace my hiking boots after a long day.
 |
| Our high point was the top of the gray rocks. The specks at lower left are people.                                                                               From nz2 |
If you only go one place in the South Island, go glacier hiking on Franz Josef Glacier. Take the all-day tour. It will be among the most spectacular things you ever do or see. If, after the tour, you don’t agree, I can only think your opinion is the result of some sort of unfortunate mental condition – just kidding (but not really)!
Seven Good Glacier Hiking Tips
1. Pick your group carefully. The first group may backtrack a lot after running into dead ends among the folds of the glacier. The last may move slowly enough to drive you crazy.
2. Bring your own sturdy, full-shank hiking boots with at least some amount of Gore-Tex. They will feel way better than the beat-up loaners. During this entire trip, My La Sportiva Trango Trek GTX boots became like best friends. A good pair of wool socks will also keep you happy.
3. Sunscreen is critical – UV rays double-team you by bouncing off the ice.
4. Don’t over-hydrate, or the bus ride back to the town will be the longest ever. Or you’ll just wind up relieving yourself in the rainforest, where the odds are that a tour group will come along (not that I’m speaking from experience).
5. In the summer, this part of thee South Island won’t be as cold as you think. Wear lightweight quick-dry pants (no jeans!) and layer your upper body. An Under Armor-type long-sleeve shirt and a pair of t-shirts should do well for you with the loaner overjacket.
6. When using crampons, keep your toes pointed straight up or straight down. Step with a little extra force, and you’ll dig right in. Don’t go sideways, or you might roll over your ankle.
7. Want bluer ice and more caves” Go in the springtime, just after winter. Cold temperatures compress the ice and cause it to turn bluer during the winter, and meltwater carves the caves out.
Another tidbit that isn’t really a tip: On a fitness scale of 1-10 (1 being easy, 10 being hard), I’d call this a four. It moved at a slow pace and simply wasn’t all that extreme. But it was beautiful and oddly moving. Even if you’re a fitness nut who thinks your heart has to beat 180 times per minute for anything to be interesting, you will still love this.
 |
| From nz2 |
50
This post just might contain affiliate links. Fear not, they’re non-spammy and benign. Hey, I have to keep this thing running somehow!
Thanks, Thomas! You might want to subscribe to the feed … I still have lots more cool stuff coming up: A tour of the glow worm caves in Waitomo, Abel Tasman Park, zorbing, the Waiotapu thermal area, and a few others.
nice blog dude!